Controlling GPIB Instruments from Ubuntu Linux


Some instruments that could usefully be computer controlled ...


Thanks to E-Bay, it is possible to acquire a lot of very high quality test gear for remarkably little money -- instruments that cost 10's of thousands of pounds when new can be found for tens of pounds (at most a few hundred). In some cases, these will be in need of a bit of TLC, but with a bit of luck, most will end up working pretty much perfectly. Your mileage may vary ... :-)

Most high end instruments from the mid-1970's onwards could be controlled by computer. In fact, computer control started in the early 1960's, but the introduction of HPIB by Hewlett-Packard around 1973 established a standard interface and protocol for controlling a wide variety of instruments. HPIB (Hewlett-Packard Interface Bus) was later standardized (pretty much unchanged) as GPIB (General Purpose Interface Bus). This was pretty much the universal means of computer control of test and measurement gear until the mid 1990's.

Many of the instruments from the late 1970's onwards, often to be found on E-Bay, can be computer controlled via GPIB ... if your computer can speak GPIB. It is worth trying to get it to do so, because a lot of tedious things can then be automated. For example, if you have a signal generator and a multimeter, you can write a program to measure the frequency respons of some device sitting between them.

There are two main ways of getting a GPIB interface for a modern PC: a PCI interface card, or a USB to GPIB converter. There are also ISA GPIB cards to be found, but unless you want to keep an ancient PC going specifically for instrument control, these are no longer useful. I would not recommend that approach myself.

Unfortunately, GPIB cards tend to be quite expensive. The choice of card used also determines (or is determined by) the software you can use on the computer. A very common approach is to use National Instruments LabVIEW software. This is a very comprehensive system which is no doubt ideal for use in major engineering companies. It can do vastly more than control a bunch of old instruments! But if what you want to do is control a bunch of old instruments ... the huge price tag might well rule it out! I would think certainly for use by hobbyists, anyway. NI extols the many virtues of LabVIEW here.

Although it was pricey, I chose to go the USB to GPIB converter route myself. Agilent make a suitable device - the 82357A USB/GPIB interface. I believe this is now itself obsolete, although the 82357B might still be current. Much cheaper clones of the 82357B can also be obtained, although I don't know how well they work (I suspect rather well, though). All the material here is specific to the 82357A/B adapters (and, probably, the clones of these). One great advantage of a USB/GPIB adapter is that it can be plugged in to a laptop machine.


Agilent 82357A USB/GPIB Interface


As you might expect, the 82357A came with a comprehensive set of software for Windows (Windows 2000 at the time). There was no support for Linux. I used it with the Agilent supplied libraries on Windows for several years, but, for a variety of reasons, I wanted to move all my personal computing to Ubuntu Linux by 2012.

Installing GPIB Support for Ubuntu Linux

Fortunately, these days, Linux has good support for GPIB, including the 82357A. At least, it does if you obtain the GPIB software for Ubuntu from Vsevolod Kukol at this site. I found other sources had problems (i.e. the GPIB software didn't work properly). You should get the following packages installed: gpib-firmware, gpib-modules-dkms, gpib-modules-source, libgpib0, libgpib0-dev and libgpib-bin.

After installation, the file /etc/gpib.conf needs to be edited to define the controller (most things in here are not important when using the software described below). For the 82357A, the following is sufficient:


interface {
	minor = 0	/* board index, minor = 0 uses /dev/gpib0, minor = 1 uses /dev/gpib1, etc. */
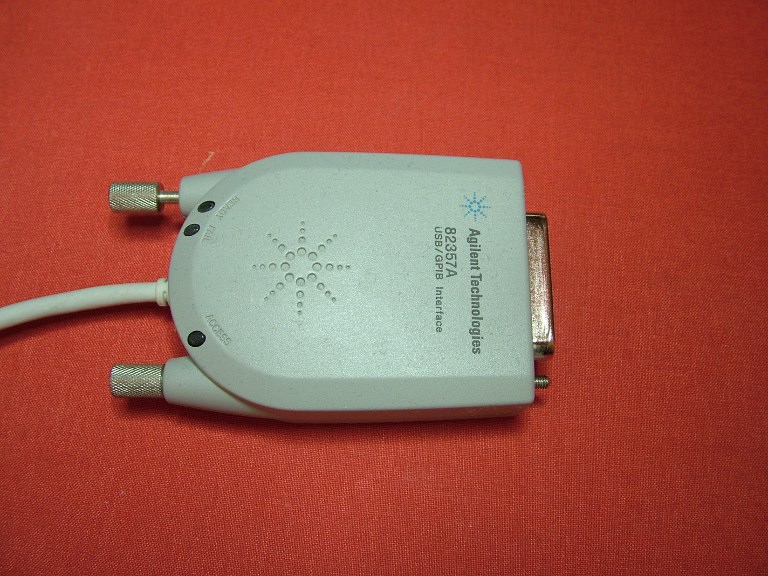
	board_type = "agilent_82357a"	/* type of interface board being used */
	name = "agilent"	/* optional name, allows you to get a board descriptor using ibfind() */
	pad = 0	/* primary address of interface             */
	sad = 0	/* secondary address of interface           */
	master = yes	/* interface board is system controller */
	timeout = TNONE	/* timeout for commands */
}

device {
       minor = 0
       name = "ATTN"
       pad = 0
       sad = 0
}


You also need to tell Ubuntu what to do when the Agilent 82357A is plugged in to the machine. This requires two files be installed in /etc/hotplug/usb. These are needed to get the firmware loaded in to the interface device (the correct firmware is shipped in the Linux GPIB packages). The first file is agilent_82357a:


#!/bin/sh
GPIB_CONFIG_OPTIONS="--minor 0"
DATADIR=/usr/share
FXLOAD=fxload
FXLOAD_OPTIONS=

PATH=$PATH:/sbin:/usr/sbin:/usr/local/sbin:/bin:/usr/bin:/usr/local/bin
FIRMWARE=

# pre-renumeration device IDs
case $PRODUCT in
# 82357a with firmware already loaded
957/107/*)
	gpib_config $GPIB_CONFIG_OPTIONS
	;;

# 82357a without firmware
957/7/*)
	FIRMWARE=$DATADIR/usb/agilent_82357a/82357a_fw.hex
	;;

# 82357b with firmware already loaded
957/718/*)
	gpib_config $GPIB_CONFIG_OPTIONS
	;;

# 82357b without firmware
957/518/*)
	FIRMWARE=$DATADIR/usb/agilent_82357a/measat_releaseX1.8.hex
	FXLOAD_OPTIONS="-t fx2"
	;;

esac

# quit unless we were called to download some firmware 
if [ "$FIRMWARE" = "" ]; then
    # OR:  restructure to do other things for
    # specific post-renumeration devices
    exit 0
fi

# missing firmware?
if [ ! -r $FIRMWARE ]; then
    if [ -x /usr/bin/logger ]; then
	/usr/bin/logger -t $0 "missing $FIRMWARE for $PRODUCT ??"
    fi
    exit 1
fi

# missing fxload?
if ! which $FXLOAD; then
    if [ -x /usr/bin/logger ]; then
	/usr/bin/logger -t $0 "missing $FXLOAD ??"
    fi
    exit 1
fi

if [ -x /usr/bin/logger ]; then
    /usr/bin/logger -t $0 "load $FIRMWARE for $PRODUCT to $DEVICE"
fi

$FXLOAD $FXLOAD_OPTIONS -I $FIRMWARE


The second is agilent_82357a.usermap. This defines the signature for the interface device so that Ubuntu can recognize it and do the right thing.


# usb module match_flags idVendor idProduct bcdDevice_lo bcdDevice_hi bDeviceClass bDeviceSubClass bDeviceProtocol bInterfaceClass bInterfaceSubClass bInterface Protocol driver_info
agilent_82357a 0x0003 0x0957 0x0007 0x0000 0x0000 0x00 0x00 0x00 0x00 0x00 0x00 0x00000000
#agilent 82357b
agilent_82357a 0x0003 0x0957 0x0518 0x0000 0x0000 0x00 0x00 0x00 0x00 0x00 0x00 0x00000000


You may be thinking: "This is all a bit complicated.". And it is, but once set up it does seem to just work (reliably). When the 82357A is plugged in, devices gpib0 to gpib15 will be found in /dev.

The GPIBlib and GPIBWrap Software

The code I wrote for controlling GPIB instruments has two parts (each of which also has two parts).
  • A C++ library: GPIBlib. There are two bits to this: a base GpibInstrument class in GPIBlib.cpp (and .h) and a set of instrument specific classes. Together, these let C++ programmers write programs that control and get data from a set of supported instruments. The GpibInstrument code should make it fairly easy to add additional specific instruments. GPIBlib is compiled to a shared library (.so) with which other C++ program may link. The instrument specific functions are quite high level, and form a sort of "language" for accessing a particular instrument.
  • A Python interface to GPIBlib: GPIBWrap.py. Python is a wonderful language IMHO, and being able to access GPIB instruments from it makes things much easier than using C++. At this stage of life, I am of the opinion that whenever performance requirements allow it, interpreted languages are much to be preferred over compiled ones. Python allows performance sensitive code to be written in C or C++ and used from an interpreted language. This is often the best of both worlds. In our case, the C-types mechanism is used to do this.
The specific instruments supported by GPIBlib/GPIBWrap are simply those I happen to own. These are:
  • HP-3325A Synthesiser/Function Generator.
  • HP-3457A Multimeter
  • HP-3582A Spectrum Analyzer
  • HP-8903E Distortion Analyzer
  • Sony/Tektronix RTD-710A Digitizer
Clearly, this code is more immediately useful if you happen to have one of these instruments too. However, it isn't too hard to add support for additional instruments. This requires two sets of code be written:
  • Support for the instrument as a C++ class derived from GpibInstrument. This would be in its own source .cpp file and corresponding include .h file.
  • Python wrappers for this new C++ code added to GPIBWrap.py.
Hopefully, examining the source code for GPIBlib will make it clear what to do. In addition to the C++ class for an instrument, C wrappers for this class need to be defined so that the Python code in GPIBWrap.py can access its functionality. The C++ code files for each instrument have the C wrappers and looking at those should make it clear what to do.

The source code for GPIBlib and GPIBWrap can be found here. It can be built by running buildlib.sh.

Documentation for the Python side can be found here. This was generated automatically by Epydoc from the docstrings in the source code. It may be helpful. A pretty crude PDF version can be found here.

GPIBWrap uses Matplotlib to draw graphs. A sample test program (to be found at the bottom of GPIBWrap.py) that includes this capability is:


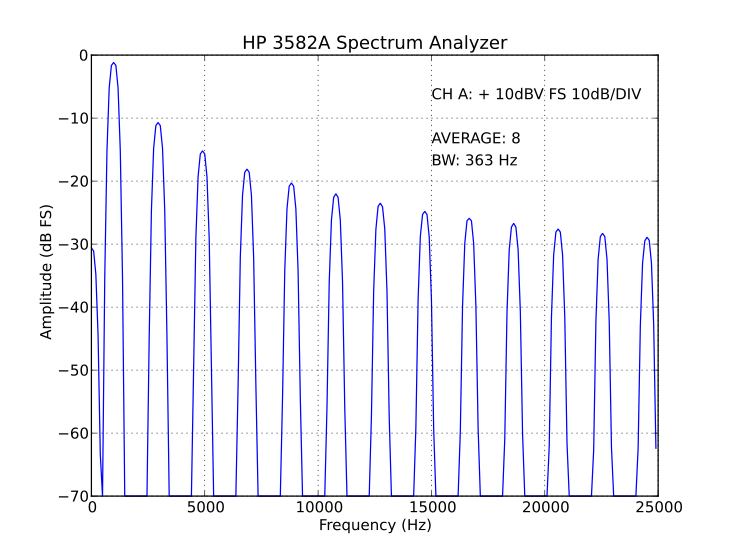
        # Generate a 1kHz, 1V square wave.
        f = HP_3325A( address['HP_3325A'], 0 )
        f.set_print_gpib(0)
        f.set_print_error(0)
        f.set_function( 'square' )
        f.set_frequency( 1, 'kHz' )
        f.set_amplitude( 1, 'v_rms' )

        # Get the signal's spectrum
        s = HP_3582A( address['HP_3582A'], 0 )
        s.set_print_gpib(0)
        s.set_print_error(0)
        s.set_input_mode( 'cha' )
        s.set_sensitivity( 'cha', 3 )
        s.start_measurement( 'rms', 5, 1 )
        (frq,cha,chb,samps,aok,bok) = s.get_spectrum()

        # Plot it.
        ann = s.read_annotation()
        ch1ann = s.parse_channel_annotation(ann,'cha')
        ch2ann = s.parse_channel_annotation(ann,'chb')
        avann = s.parse_average_annotation(ann)
        bwann = s.parse_bandwidth_annotation(ann)
        plt.plot(frq[0:samps-1],cha[0:samps-1])
        plt.title( 'HP 3582A Spectrum Analyzer' )
        plt.xlabel( 'Frequency (Hz)' )
        plt.ylabel( 'Amplitude (dBV)' )
        plt.grid( True )
        ax = plt.gca()
        plt.text( 0.6, 0.90, ch1ann, transform=ax.transAxes )
        plt.text( 0.6, 0.85, ch2ann, transform=ax.transAxes )
        plt.text( 0.6, 0.80, avann, transform=ax.transAxes )
        plt.text( 0.6, 0.75, bwann, transform=ax.transAxes )
        plt.show()


This results in the graph shown below. (The test code in GPIBWrap .py can be run with the command: python GPIBWrap.py, of course.)


Measurements made with GPIBlib/GPIBWrap and plotted with Matplotlib

Upgrading to Ubuntu 14.04 LTS

This upgrade will stop GPIB working. Vsevelod Kukol no longer maintains a working version of the Ubuntu GPIB code. He stopped at V13. Fortunately, Phil Pemberton has taken up the gauntlet and you should be able to upgrade the GPIB kernel modules from his private package archive. Here are the steps required.
#!/bin/bash
echo "Fetch new gpib-modules-dkms for Ubuntu 14.04 and upgrade."
#
# Vsevelod Kukol no longer maintains Ubuntu GPIB. He stopped at V13.
# Fortunately, Phil Pemberton has taken up the gauntlet.
# This script gets the updated kernel modules from his PPA
# and installs them
#
sudo add-apt-repository ppa:philpem/ppa
sudo apt-get update
echo "The next step will take ome time."
echo "It removes all previous GPIB kernel modules from all the Ubuntu"
echo "kernel versions that have ever been installed. Which will be lots."
echo "Please just let it run."
sudo apt-get install gpib-modules-dkms
echo "Done. Try plugging in the Agilent 82357A. It should load firmware"
echo "and work as it did on 12.04 LTS."
After this, everything works again. YMMV!

I hope this software might be of some use to people other than myself. Feel free to do anything you like with it, although I'd be grateful if you acknowledged where it came from if you do use it.


Go home ...